01 shell
-01 종류
-02 로그인쉘 / 서브쉘
02 환경설정
03 변수 선언
-01 날짜 계산, 변수 선언
-02 변수 사용
-03 파일 크기 계산하기
04 권한 설정
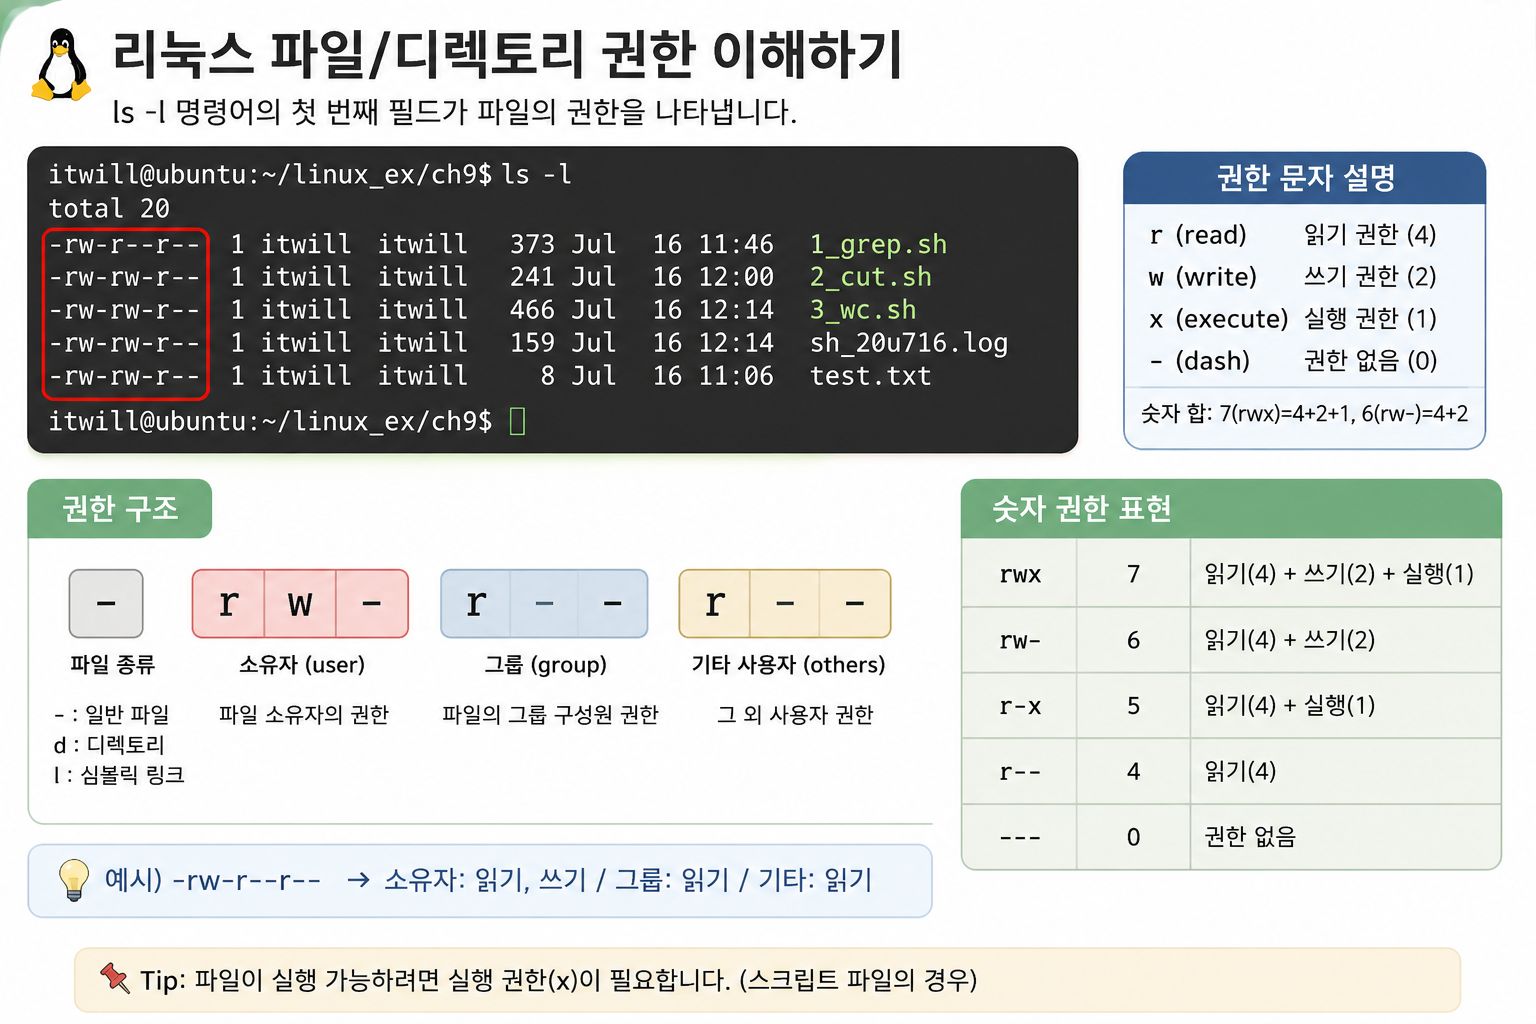
-01 권한의 구성
-02 숫자 모드 권한
-03 문자 모드 권한
05 조건문
01 shell
사용자가 입력한 명령어를 운영체제(커널)에 전달해서 실행시켜주는 명령어 해석기이며, 하드웨어 혹은 소프트웨어를 관리하기 위한 언어이다.
-01 종류
sh(본쉘), csh, ksh(콘쉘), bash, dash
+) 설치위치 확인하기 : which
itwill@ubuntu:~$ which python3
/usr/bin/python3
itwill@ubuntu:~$ which sh
/usr/bin/sh
itwill@ubuntu:~$ which ksh
itwill@ubuntu:~$ which ch
itwill@ubuntu:~$ which bash
/usr/bin/bash
-02 로그인쉘 / 서브쉘
1) 로그인쉘 : 유저가 접속해서 프롬프트에 작성한 명령어를 해석하는 쉘
* 로그인쉘 확인 방법 : /etc/passwd 파일의 마지막 필드
itwill@ubuntu:~$ grep ^itwill /etc/passwd
itwill:x:1000:1000:itwill:/home/itwill:/bin/bash
bash임을 확인할 수 있다.
2) 서브쉘 : 각 스크립트마다 작성한 명령어를 해석할 수 있도록 설정하는 쉘
각 스크립트마다 맨 첫줄에 서브쉘 지정이 가능하다. (#!/bin/bash)
02 환경설정
환경설정 파일은 사용자의 환경 세팅과 관련된 설정 파일이다.
alias 지정, 프롬포트 출력 지정 등을 수행할 수 있다.
.profile, .bashrc 등이 있으며 로그인 후 반영이 되는 구조이다.
따라서 수정 후 즉시 효력이 발생하지 않아 재접속 후 사용이 가능하다.
만약 재접속을 하고 싶지 않은 경우 .profile을 수동으로 재실행주는 방법이 있다.
. .profile
( . 은 디렉토리에 관련된 cd, ls 등과 사용할 시에는 현재 디렉토리로 사용되나, 단독으로 사용 시 뒤에 있는 파일을 실행시키는 실행의 의미를 가진다.)
환경설정 파일은 숨김파일이라 보이지 않으며, 사용자 계정의 홈 디렉토리에 위치해 있다.
ls -a 를 통해 숨김파일까지 확인할 수 있다.
itwill@ubuntu:~$ ls
Desktop    Downloads  Pictures  Templates  linex_ex  linux_ex2   services
Documents  Music      Public    Videos     linux_ex  python.log  snap
itwill@ubuntu:~$ ls -a
.              .bashrc  .profile   Downloads  Templates  linux_ex2
..             .cache   .ssh       Music      Videos     python.log
.bash_history  .config  Desktop    Pictures   linex_ex   servic
vi .profile 을 통해 편집모드로 들어간다.
# ~/.profile: executed by the command interpreter for login shells.
# This file is not read by bash(1), if ~/.bash_profile or ~/.bash_login
# exists.
# see /usr/share/doc/bash/examples/startup-files for examples.
# the files are located in the bash-doc package.

# the default umask is set in /etc/profile; for setting the umask
# for ssh logins, install and configure the libpam-umask package.
#umask 022

# if running bash
if [ -n "$BASH_VERSION" ]; then
    # include .bashrc if it exists
    if [ -f "$HOME/.bashrc" ]; then
        . "$HOME/.bashrc"
    fi
fi

# set PATH so it includes user's private bin if it exists
if [ -d "$HOME/bin" ] ; then
    PATH="$HOME/bin:$PATH"
fi
...
shift + G를 통해 마지막줄로 넘어간다.
...

# set PATH so it includes user's private bin if it exists
if [ -d "$HOME/.local/bin" ] ; then
    PATH="$HOME/.local/bin:$PATH"
fi
원하는 alias 설정 옵션을 입력 후 :wq 로 저장 후 나가기한다.
# alias
alias c='clear'
alias cds='cd /home/itwill/linux_ex/ch9'

:wq
해당 수정사항은 재접속 후 반영이 된다.
이미 열려 있는 세션에서는 입력이 되지 않기 때문에 재접속을 진행하면 된다.
[재접속 전]
itwill@ubuntu:~$ c
c: command not found
itwill@ubuntu:~$ cds
Command 'cds' not found, did you mean:
  command 'sds' from deb simh (3.8.1-6.3)
  command 'cdv' from deb erlang-observer (1:27.3.4.6+dfsg-1)
  command 'cd5' from deb cd5 (0.1-4build1)
  command 'cvs' from deb cvs (2:1.12.13+real-31)
  command 'cde' from deb cde (0.1+git9-g551e54d-3)
  command 'cdo' from deb cdo (2.5.4-1)
  command 'cdp' from deb irpas (0.10-10build1)
  command 'cas' from deb amule-utils (1:2.3.3-3.2)
  command 'cdi' from deb cdo (2.5.4-1)
  command 'cjs' from deb cjs (128.1-2)
  command 'mcds' from deb mcds (1.9-5build1)
  command 'dcs' from deb drbl (5.7.12-1)
  command 'cdw' from deb cdw (0.8.1-3build4)
  command 'cs' from deb csound (1:6.18.1+dfsg-6build2)
  command 'cdb' from deb tinycdb (0.81-2build1)
Try: sudo apt install <deb name>


[재접속 후]
itwill@ubuntu:~$ cds
itwill@ubuntu:~/linux_ex/ch9$
03 변수 선언
-01 날짜 계산, 변수 선언
itwill@ubuntu:~/linux_ex/ch9$ date
Thu Jul 16 10:45:15 AM KST 2026
itwill@ubuntu:~/linux_ex/ch9$ date +%Y
2026
itwill@ubuntu:~/linux_ex/ch9$ date +%y
26
itwill@ubuntu:~/linux_ex/ch9$ date +%y%m%d
260716
itwill@ubuntu:~/linux_ex/ch9$ todate=$(date +%y%m%d)
itwill@ubuntu:~/linux_ex/ch9$ echo $todate
260716
itwill@ubuntu:~/linux_ex/ch9$ touch file_$todate
itwill@ubuntu:~/linux_ex/ch9$ ls
file_260716
만약 시/분/초 (%H%M%S) 역시 totime으로 지정하여서 file_$todate_$totime으로 빈 파일을 만드려는 경우, totime만 인지하게 된다.
itwill@ubuntu:~/linux_ex/ch9$ touch file_$todate_$totime
itwill@ubuntu:~/linux_ex/ch9$ ls
file_104900  file_260716
따라서 중괄호를 이용하여 여기서부터 여기까지가 변수의 이름이다라고 선언해야할 필요가 있다.
(totime의 경우 뒤에 변수가 없어서 중괄호를 생략해도 무관)
itwill@ubuntu:~/linux_ex/ch9$ touch file_${todate}_${totime}
itwill@ubuntu:~/linux_ex/ch9$ ls
file_104900  file_260716  file_260716_104900
-02 변수 사용
1) 변수 선언 : 띄어쓰기 없이 "변수명=값" 형태로 전달
ex) $ a1=100
2) 변수 호출 : "$변수명" 형태로 호출
ex) $ echo $a1
3) 명령어 결과를 변수에 저장 : 변수명=$(명령어) 또는 변수명=`명령어` 형태로 전달
ex) $ todate=$(date +%y%m%d)
4) 변수명 뒤에 문자열이 붙는 경우 -> {}를 사용하여 변수명을 구분하여 전달
ex) $ touch file_$todate
$ touch file_${todate}.log
[ 1번 세션 ]
#!/bin/sh

# 유저명을 입력받고, 해당 유저의 로그인쉘을 출력하는 쉘스크립트

echo "유저명을 입력하세요 : \c"
read username

grep -w ^$username /etc/passwd

[ 2번 세션 ]
itwill@ubuntu:~$ cd ~/linux_ex/ch9
itwill@ubuntu:~/linux_ex/ch9$ sh 1_grep.sh
유저명을 입력하세요 : itwill
itwill:x:1000:1000:itwill:/home/itwill:/bin/bash
itwill@ubuntu:~/linux_ex/ch9$ echo abced | cut -b1
a
itwill@ubuntu:~/linux_ex/ch9$ echo abcde | cut -b1-3
abc
itwill@ubuntu:~/linux_ex/ch9$ echo abced | cut -c1-3
abc
itwill@ubuntu:~/linux_ex/ch9$ echo a:b:c:d:e | cut -d: -f1
a
itwill@ubuntu:~/linux_ex/ch9$ echo a:b:c:d:e | cut -d: -f2
b
itwill@ubuntu:~/linux_ex/ch9$ echo a:b:c:d:e | cut -d: -f3
c
itwill@ubuntu:~/linux_ex/ch9$ echo a:b:c:d:e | cut -d: -f4
d
itwill@ubuntu:~/linux_ex/ch9$ echo a:b:c:d:e | cut -d: -f5
e
itwill@ubuntu:~/linux_ex/ch9$ grep -w ^itwill /etc/passwd
itwill:x:1000:1000:itwill:/home/itwill:/bin/bash
itwill@ubuntu:~/linux_ex/ch9$ grep -w ^itwill /etc/passwd | cut -d: -f7
/bin/bash
[ 1번 세션 ]
#!/bin/sh
# 유저명을 입력받고, 해당 유저의 로그인쉘을 출력하는 쉘스크립트
echo "유저명을 입력하세요 : \c"
read username
homedir=$(grep "^${username}:" /etc/passwd | cut -d: -f6)
logsh=$(grep "^${username}:" /etc/passwd | cut -d: -f7)
echo "$username 유저의 홈디렉토리: $homedir"
echo "$username 유저의 로그인 셸: $logsh"
[ 2번 세션 ]
itwill@ubuntu:~/linux_ex/ch9$ sh 1_grep.sh
유저명을 입력하세요 : itwill
itwill 유저의 홈디렉토리: /home/itwill
itwill 유저의 로그인 셸: /bin/bash-03 파일 크기 계산하기
ls -l 활용
itwill@ubuntu:~/linux_ex/ch9$ ls -l 1_grep.sh
-rw-rw-r-- 1 itwill itwill 377 Jul 16 11:34 1_grep.sh


itwill@ubuntu:~/linux_ex/ch9$ ls -l 1_grep.sh | cut -d" " -f1
-rw-rw-r--

itwill@ubuntu:~/linux_ex/ch9$ ls -l 1_grep.sh | cut -d" " -f2
1

itwill@ubuntu:~/linux_ex/ch9$ ls -l 1_grep.sh | cut -d" " -f3
itwill

itwill@ubuntu:~/linux_ex/ch9$ ls -l 1_grep.sh | cut -d" " -f4
itwill

itwill@ubuntu:~/linux_ex/ch9$ ls -l 1_grep.sh | cut -d" " -f5
377
2번 세션에서
itwill@ubuntu:~/linux_ex/ch9$ cp 1_grep.sh 2_cut.sh
itwill@ubuntu:~/linux_ex/ch9$ vi 2_cut.sh
로 1_grep.sh 을 2_cut.sh로 복사하였다.
[ 2번 세션 ]
#!/bin/sh

# 파일명을 입력받고, 해당 파일의 파일사이즈를 출력하는 쉘스크립트

echo "파일명을 입력하세요 : \c"

read fname

fsize=$(ls -l $fname | cut -d" " -f5)

echo "$fname 파일의 사이즈 : $fsize"

[ 1번 세션 ]
itwill@ubuntu:~/linux_ex/ch9$ sh 2_cut.sh
파일명을 입력하세요 : /home/itwill/linux_ex/ch9/2_cut.sh
/home/itwill/linux_ex/ch9/2_cut.sh 파일의 사이즈 : 242
다시 itwill@ubuntu:~/linux_ex/ch9$ vi 3_wc.sh 로 새로운 쉘 작성을 시작한다.
[ 1번 세션 ]
#!/bin/sh


# 디렉토리명을 입력받고 해당 디렉토리 하위의 일반파일의 수 출력

echo "디렉토리 경로를 입력하세요 (절대경로) \c"
read dir

cd $dir
echo "$dir 디렉토리로 이동하겠습니다."
echo "현재디렉토리 : $(pwd)"

fnum=`ls -l | grep ^- | wc -l`
echo "$dir 디렉토리 하위 파일 수 : $fnum"

[ 2번 세션 ]
itwill@ubuntu:~/linux_ex/ch9$ sh 3_wc.sh
디렉토리 경로를 입력하세요 (절대경로) /home/itwill/linux_ex
/home/itwill/linux_ex 디렉토리로 이동하겠습니다.
현재디렉토리 : /home/itwill/linux_ex
/home/itwill/linux_ex 디렉토리 하위 파일 수 : 2
파일의 생성 및 수정 등에는 절대경로를 명시하는 것이 좋다.
[ 1번 세션 ]
#!/bin/sh


# 디렉토리명을 입력받고 해당 디렉토리 하위의 일반파일의 수 출력

todate=$(date +%y%m%d)
logname=/home/itwill/linux_ex/ch9/sh_${todate}.log

echo "디렉토리 경로를 입력하세요 (절대경로) : \c"
read dir

cd $dir
echo "$dir 디렉토리로 이동하겠습니다." >> $logname
echo "현재디렉토리 : $(pwd)" >> $logname

fnum=`ls -l | grep ^- | wc -l`
echo "$dir 디렉토리 하위 파일 수 : $fnum" >> $logname

[ 2번 세션 ]
itwill@ubuntu:~/linux_ex/ch9$ ls
1_grep.sh  2_cut.sh  3_wc.sh  sh_260716.log  test.txt

itwill@ubuntu:~/linux_ex/ch9$ cat sh_260716.log
/home/itwill/linux_ex 디렉토리로 이동하겠습니다.
현재디렉토리 : /home/itwill/linux_ex
/home/itwill/linux_ex 디렉토리 하위 파일 수 : 3
로그가 정상적으로 출력되었음을 확인할 수 있다.
04 권한 설정
-01 권한의 구성
권한은 다음과 같이 세 세트로 구성되어 있다. :
1) 소유자
umadk : 권한의 기본값 (주로 서버 엔지니어가 관리)
설령 파일을 만든 본인 계정이라 하더라도 모든 권한이 허용되어 있지는 않다.
2) 그룹
itwill 그룹에는 itwill 유저가 소속되어 있다.
그룹에 속하지 않는 유저는 존재할 수 없다.
3) 기타 사용자
그 외 사용자를 뜻한다.
즉 -rw-r--r-- 1 itwill itwill ...1_grep.sh
1_grep.sh은 itwill 그룹에 속한 itwill 유저가 만든 파일(-)이며 itwill 유저는 이 파일을 읽고 쓸 수 있으나 실행권한은 없다(rw-).
+) 디렉토리의 경우 읽기권한이 없다면 ls로 디렉토리 하의 파일을 열람할 수 없다.
+) 디렉토리의 경우 쓰기권한이 없다면 touch, cp 등을 이용해 새로운 파일을 생성할 수 없다.
+) 디렉토리의 경우 실행권한이 없다면 cd로 디렉토리로 하위의 이동이 불가능하다.
-02 숫자 모드 권한
또한 권한의 경우 기호뿐만이 아니라 숫자모드로 변경할 수도 있다.
r w x 는 2진법으로 구성되어 있다.
2^2 2^1 2^0 으로 각자 4,2,1의 숫자를 가진다.
따라서 모든 권한을 부여하게 된다면 7 7 7 과 같은 형식으로 부여한다.
1) hosts 에 모든 권한 부여하기
chmod 777 hosts
itwill@ubuntu:~/linux_ex$ ls -l
total 28
-rw-rw-r-- 1 itwill itwill    0 Jul 14 15:08 a.txt
drwxrwxr-x 4 itwill itwill 4096 Jul 14 16:20 ch1
drwxrwxr-x 3 itwill itwill 4096 Jul 15 16:11 ch2
drwxrwxr-x 2 itwill itwill 4096 Jul 14 13:00 ch3
drwxrwxr-x 2 itwill itwill 4096 Jul 14 13:00 ch4
drwxrwxr-x 2 itwill itwill 4096 Jul 16 13:49 ch5
drwxrwxr-x 2 itwill itwill 4096 Jul 16 13:20 ch9
-rw-r--r-- 1 itwill itwill  221 Jul 14 14:56 hosts

itwill@ubuntu:~/linux_ex$ chmod 777 hosts

itwill@ubuntu:~/linux_ex$ ls -l
total 28
-rw-rw-r-- 1 itwill itwill    0 Jul 14 15:08 a.txt
drwxrwxr-x 4 itwill itwill 4096 Jul 14 16:20 ch1
drwxrwxr-x 3 itwill itwill 4096 Jul 15 16:11 ch2
drwxrwxr-x 2 itwill itwill 4096 Jul 14 13:00 ch3
drwxrwxr-x 2 itwill itwill 4096 Jul 14 13:00 ch4
drwxrwxr-x 2 itwill itwill 4096 Jul 16 13:49 ch5
drwxrwxr-x 2 itwill itwill 4096 Jul 16 13:20 ch9
-rwxrwxrwx 1 itwill itwill  221 Jul 14 14:56 hosts
chmod 444 hosts
itwill@ubuntu:~/linux_ex$ chmod 444 hosts

itwill@ubuntu:~/linux_ex$ ls -l
total 28
-rw-rw-r-- 1 itwill itwill    0 Jul 14 15:08 a.txt
drwxrwxr-x 4 itwill itwill 4096 Jul 14 16:20 ch1
drwxrwxr-x 3 itwill itwill 4096 Jul 15 16:11 ch2
drwxrwxr-x 2 itwill itwill 4096 Jul 14 13:00 ch3
drwxrwxr-x 2 itwill itwill 4096 Jul 14 13:00 ch4
drwxrwxr-x 2 itwill itwill 4096 Jul 16 13:49 ch5
drwxrwxr-x 2 itwill itwill 4096 Jul 16 13:20 ch9
-r--r--r-- 1 itwill itwill  221 Jul 14 14:56 hosts
편집기로 이동해본다.
vi hosts
"hosts" [readonly] 9 lines, 221 bytes
읽기 권한만 부여했기 떄문에 readonly를 하단에서 확인할 수 있다.
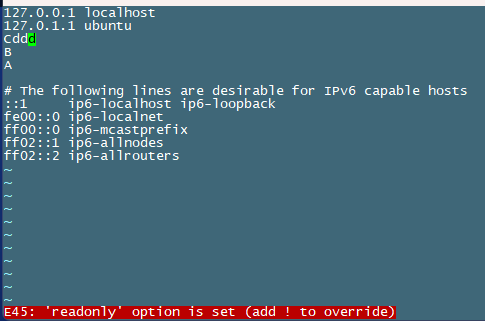
수정 후 :w 를 시도해보아도 읽기 전용이기 때문에 하단에 오류가 발생한다.
:q! 로 빠져나온다.
ch9 하위 디렉토리에 대한 읽기 권한을 삭제해본다.
chmod 333 ch9
itwill@ubuntu:~/linux_ex$ chmod 333 ch9
itwill@ubuntu:~/linux_ex$ ls -l
total 28
-rw-rw-r-- 1 itwill itwill    0 Jul 14 15:08 a.txt
drwxrwxr-x 4 itwill itwill 4096 Jul 14 16:20 ch1
drwxrwxr-x 3 itwill itwill 4096 Jul 15 16:11 ch2
drwxrwxr-x 2 itwill itwill 4096 Jul 14 13:00 ch3
drwxrwxr-x 2 itwill itwill 4096 Jul 14 13:00 ch4
drwxrwxr-x 2 itwill itwill 4096 Jul 16 13:49 ch5
d-wx-wx-wx 2 itwill itwill 4096 Jul 16 13:20 ch9
-r--r--r-- 1 itwill itwill  221 Jul 14 14:56 hosts

itwill@ubuntu:~/linux_ex$ ls ch9
ls: cannot open directory 'ch9': Permission denied
읽기, 쓰기 권한만 부여해본다.
chmod 666 ch9
itwill@ubuntu:~/linux_ex$ chmod 666 ch9

itwill@ubuntu:~/linux_ex$ ls -l
total 28
-rw-rw-r-- 1 itwill itwill    0 Jul 14 15:08 a.txt
drwxrwxr-x 4 itwill itwill 4096 Jul 14 16:20 ch1
drwxrwxr-x 3 itwill itwill 4096 Jul 15 16:11 ch2
drwxrwxr-x 2 itwill itwill 4096 Jul 14 13:00 ch3
drwxrwxr-x 2 itwill itwill 4096 Jul 14 13:00 ch4
drwxrwxr-x 2 itwill itwill 4096 Jul 16 13:49 ch5
drw-rw-rw- 2 itwill itwill 4096 Jul 16 13:20 ch9
-r--r--r-- 1 itwill itwill  221 Jul 14 14:56 hosts

itwill@ubuntu:~/linux_ex$ ls ch9
1_grep.sh  2_cut.sh  3_wc.sh  sh_260716.log  test.txt
itwill@ubuntu:~/linux_ex$ cd ch9
-bash: cd: ch9: Permission denied
그러나 실행 (cd를 통한 하위 디렉토리로의 접근)은 거절되었다.
itwill@ubuntu:~/linux_ex$ chmod 775 ch9 로 원래 옵션대로 복구한다.
이번에는 ch5에 대해 쓰기를 빼고 읽기, 실행만 부여한다.
itwill@ubuntu:~/linux_ex$ chmod 555 ch5

itwill@ubuntu:~/linux_ex$ ls -l
total 28
-rw-rw-r-- 1 itwill itwill    0 Jul 14 15:08 a.txt
drwxrwxr-x 4 itwill itwill 4096 Jul 14 16:20 ch1
drwxrwxr-x 3 itwill itwill 4096 Jul 15 16:11 ch2
drwxrwxr-x 2 itwill itwill 4096 Jul 14 13:00 ch3
drwxrwxr-x 2 itwill itwill 4096 Jul 14 13:00 ch4
dr-xr-xr-x 2 itwill itwill 4096 Jul 16 13:49 ch5
drwxrwxr-x 2 itwill itwill 4096 Jul 16 13:20 ch9
-r--r--r-- 1 itwill itwill  221 Jul 14 14:56 hosts

itwill@ubuntu:~/linux_ex$ touch ch5/a.sh
touch: cannot touch 'ch5/a.sh': Permission denied

itwill@ubuntu:~/linux_ex$ cp hosts ch5/
cp: cannot create regular file 'ch5/hosts': Permission denied
touch를 통한 파일 생성, cp를 통한 복사 등이 불가능함을 알 수 있다.
-03 기호 모드 권한
현재 기준으로
ch mod a+x
모든 유저들에 (a) x 권한을 주는 식이다.

다른 사용자들에게 실행 권한을 부여한다.
chmod o+x a.txt
itwill@ubuntu:~/linux_ex$ chmod o+x a.txt

itwill@ubuntu:~/linux_ex$ ls -l
total 28
-rw-rw-r-x 1 itwill itwill    0 Jul 14 15:08 a.txt
drwxrwxr-x 4 itwill itwill 4096 Jul 14 16:20 ch1
drwxrwxr-x 3 itwill itwill 4096 Jul 15 16:11 ch2
drwxrwxr-x 2 itwill itwill 4096 Jul 14 13:00 ch3
drwxrwxr-x 2 itwill itwill 4096 Jul 14 13:00 ch4
dr-xr-xr-x 2 itwill itwill 4096 Jul 16 13:49 ch5
drwxrwxr-x 2 itwill itwill 4096 Jul 16 13:20 ch9
-r--r--r-- 1 itwill itwill  221 Jul 14 14:56 hosts
이번에는 hosts에 쓰기 권한을 주기로 한다.
chmod a+w hosts
itwill@ubuntu:~/linux_ex$ chmod a+w hosts
itwill@ubuntu:~/linux_ex$ ls -l
total 28
-rw-rw-r-x 1 itwill itwill    0 Jul 14 15:08 a.txt
drwxrwxr-x 4 itwill itwill 4096 Jul 14 16:20 ch1
drwxrwxr-x 3 itwill itwill 4096 Jul 15 16:11 ch2
drwxrwxr-x 2 itwill itwill 4096 Jul 14 13:00 ch3
drwxrwxr-x 2 itwill itwill 4096 Jul 14 13:00 ch4
dr-xr-xr-x 2 itwill itwill 4096 Jul 16 13:49 ch5
drwxrwxr-x 2 itwill itwill 4096 Jul 16 13:20 ch9
-rw-rw-rw- 1 itwill itwill  221 Jul 14 14:56 hosts
ch5에서 소유자와 같은 그룹에 대해서는 쓰기 권한이 있게, 그 외에는 권한이 없게 만들어본다.
chmod ug+w ch5
itwill@ubuntu:~/linux_ex$ chmod ug+w ch5

itwill@ubuntu:~/linux_ex$ ls -l
total 28
-rw-rw-r-x 1 itwill itwill    0 Jul 14 15:08 a.txt
drwxrwxr-x 4 itwill itwill 4096 Jul 14 16:20 ch1
drwxrwxr-x 3 itwill itwill 4096 Jul 15 16:11 ch2
drwxrwxr-x 2 itwill itwill 4096 Jul 14 13:00 ch3
drwxrwxr-x 2 itwill itwill 4096 Jul 14 13:00 ch4
drwxrwxr-x 2 itwill itwill 4096 Jul 16 13:49 ch5
drwxrwxr-x 2 itwill itwill 4096 Jul 16 13:20 ch9
-rw-rw-rw- 1 itwill itwill  221 Jul 14 14:56 hosts
[ 연습문제 ]
1. ~/lunux_ex/ch9/log 디렉토리 생성
mkdir log
2. itwill 유저에 대해서만 rwx 권한을 가지고 다른 유저들에 대한 모든 권한은 회수
3. ~/linux_ex/ch9/log 디렉토리 하위에 20260716 디렉토리 생성
4. 이전에 작성한 3_wc.sh 파일의 로그가 ~/linux_ex/ch9/log/20260716 밑에 sh.log로 쌓이게 수정
#!/bin/sh


# 디렉토리명을 입력받고 해당 디렉토리 하위의 일반파일의 수 출력

todate=$(date +%y%m%d)
logname=/home/itwill/linux_ex/ch9/${todate}/sh.log

echo "디렉토리 경로를 입력하세요 (절대경로) : \c"
read dir

cd ${dir}
echo "$dir 디렉토리로 이동하겠습니다." >> ${logname}
echo "현재디렉토리 : $(pwd)" >> ${logname}

fnum=$(ls -l | grep ^- | wc -l)
echo "${dir} 디렉토리 하위 파일 수 : $fnum" >> ${logname}
(강사님 필기 확인)
itwill@ubuntu:~/linux_ex$ chmod -R 777 ch9
itwill@ubuntu:~/linux_ex$ ll ch9
total 56
drwxrwxrwx 3 itwill itwill  4096 Jul 16 14:55 ./
drwxrwxr-x 8 itwill itwill  4096 Jul 16 13:55 ../
-rwxrwxrwx 1 itwill itwill 12288 Jul 16 11:34 .1_grep.sh.swp*
-rwxrwxrwx 1 itwill itwill 12288 Jul 16 12:14 .3_wc.sh.swp*
-rwxrwxrwx 1 itwill itwill   377 Jul 16 11:34 1_grep.sh*
-rwxrwxrwx 1 itwill itwill   242 Jul 16 12:00 2_cut.sh*
-rwxrwxrwx 1 itwill itwill   480 Jul 16 14:54 3_wc.sh*
drwxrwxrwx 2 itwill itwill  4096 Jul 16 14:55 log/
-rwxrwxrwx 1 itwill itwill   161 Jul 16 12:14 sh_260716.log*
-rwxrwxrwx 1 itwill itwill     8 Jul 16 11:06 test.txt*

itwill@ubuntu:~/linux_ex$ chmod -R 744 ch9
itwill@ubuntu:~/linux_ex$ ls ch9
1_grep.sh  2_cut.sh  3_wc.sh  log  sh_260716.log  test.txt

itwill@ubuntu:~/linux_ex$ ls -l ch9
total 24
-rwxr--r-- 1 itwill itwill  377 Jul 16 11:34 1_grep.sh
-rwxr--r-- 1 itwill itwill  242 Jul 16 12:00 2_cut.sh
-rwxr--r-- 1 itwill itwill  480 Jul 16 14:54 3_wc.sh
drwxr--r-- 2 itwill itwill 4096 Jul 16 14:55 log
-rwxr--r-- 1 itwill itwill  161 Jul 16 12:14 sh_260716.log
-rwxr--r-- 1 itwill itwill    8 Jul 16 11:06 test.txt
05 조건문
** 비교연산자
$var1="test"
$var1="test"
$var1 -eq 100 (=)
$var1 -ne 100 (!=)
$var1 -gt 100 (>)
$var1 -ge 100 (>=)
$var1 -lt 100 (<)
$var1 -le 100 (<=)
if [ -z $var1 ] -> var1 변수에 값이 null이면 참
[ 1번 세션 ]
#!/bin/sh

# 디렉토리명을 입력바독 해당 디렉토리 사이즈 (disk usage)확인

echo "디렉토리명을 입력하세요 : \c"
read dir

if [ -d $dir ]
  then
    dsize=$(du -sk $dir)
    echo "$dir 사이즈 : $dsize"
  else
    echo "$dir 디렉토리는 존재하지 않습니다"
fi
grep으로 걸러지는 출력이 하나라도 있으면 참, 없으면 거짓이다.
즉, grep은 참/거짓을 결정하는데에 도움을 준다.
0 정상, 1,2 비정상
[ 1번 세션 ]
#!/bin/sh

# 유저명을 입력받고, 해당 유저의 로그인쉘을 출력하는 쉘스크립트

echo "유저명을 입력하세요 : \c"
read username

if grep -w ^$username /etc/passwd > /dev/null
  then
    logsh=$(grep -w ^$username /etc/passwd | cut -d: -f7)
    homedir=$(grep -w ^$username /etc/passwd | cut -d: -f6)

    echo "$username 유저의 홈디렉토리 : $homedir"
    echo "$username 유저의 로그인쉘 : $logsh"
  else
    echo $username 유저가 존재하지 않습니다"
fi

[ 2번 세션 ]
itwill@ubuntu:~/linux_ex/ch9$ ls 1_grep.sh
1_grep.sh
itwill@ubuntu:~/linux_ex/ch9$ echo $?
0
itwill@ubuntu:~/linux_ex/ch9$ grep itwill /etc/passwd
itwill:x:1000:1000:itwill:/home/itwill:/bin/bash
itwill@ubuntu:~/linux_ex/ch9$ echo $?
0
itwill@ubuntu:~/linux_ex/ch9$ grep hong /etc/passwd
itwill@ubuntu:~/linux_ex/ch9$ echo $?
1
itwill@ubuntu:~/linux_ex/ch9$ ls 1_g
ls: cannot access '1_g': No such file or directory
itwill@ubuntu:~/linux_ex/ch9$ echo $?
2'아이티윌_데이터 분석 55기 > 강의내용_Linux' 카테고리의 다른 글
| #6 6일차_파이썬 스크립트 실행, 로깅 처리, 정렬, 특수기호 정의 (1) | 2026.07.22 |
|---|---|
| #5 5일차_반복문, 산술연산, 색 변수 설정, 지역변수/전역변수, 아나콘다 설치 (0) | 2026.07.21 |
| #4 4일차_서버 이식, if/case, windcp, 유저생성/소유자 변경, find, 리다이렉션, crontab (0) | 2026.07.20 |
| #2 2일차_편집기 및 디렉토리 / 파일 확인하기 / 패턴 검색 / 파이프 (0) | 2026.07.15 |
| #1 1일차_Linux 설치 (0) | 2026.07.14 |