01 리눅스 서버 이식 방법
02 if문
03 case문
04 서버 대 서버 파일 전송 프로그램 - winscp
05 유저 생성 및 파일/디렉토리 소유자 변경
-01 useradd
-02 chown
-03 su
06 find
07 리다이렉션
08 crontab - 예약 기능
01 리눅스 서버 이식 방법
* 학원 pc 리눅스 서버 -> 홈 pc 복사
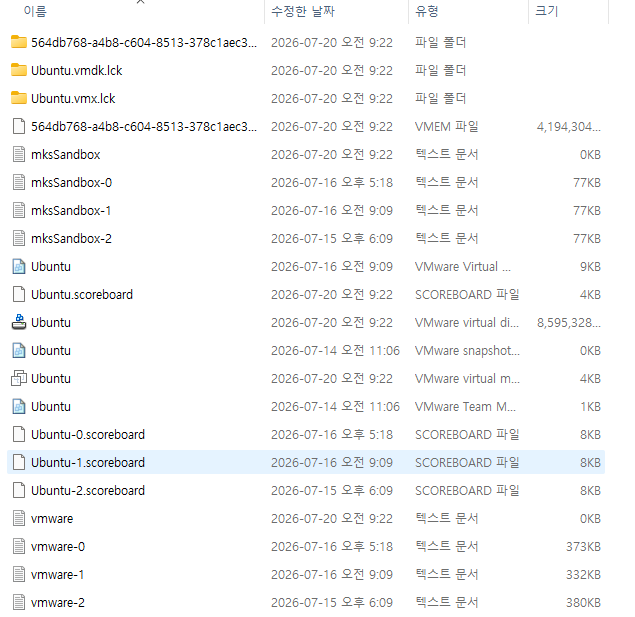
.lck 파일을 제외하고 파일이 손상이 되거나 복사가 안되면 문제가 발생한다.

*주의 : 특히 해당 파일의 손상은 매우 치명적이다.
< 학원 pc >
1) 리눅스 서버를 닫아준다.
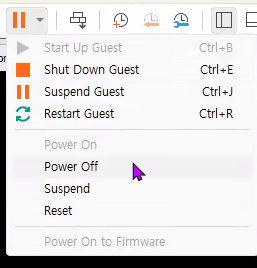
power off가 아니라 Shut Down Guest로 종료해야 한다.
2) 리눅스 이미지 디렉토리 (설치위치에 있음)를 복사한다.
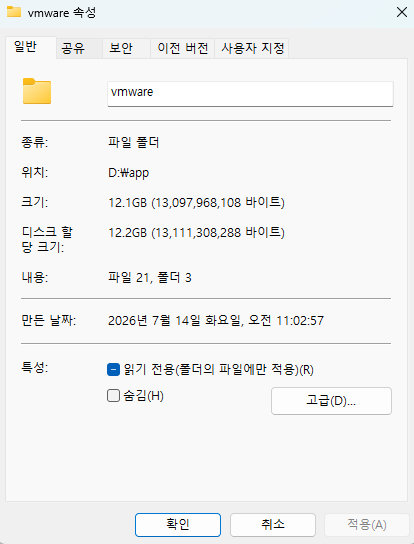
12GB 정도의 대용량이기 때문에 홈 pc에 이 이상의 용량이 남아있어야 한다.
< 홈 pc >
1) vmware를 설치한다.
2) 리눅스 이미지 디렉토리를 붙여넣는다.
3) 서버를 연 뒤 vmware에서 home > open a virtual machin 을 누른 후 붙여넣기 한 이미지 디렉토리 하위의 Ubuntu configuration 파일을 선택하고 열어준다. copy or move 선택창이 뜨면 copy를 선택한다.
4) IP 확인 ($ ifconfig)
5) putty 설치 후 해당 ip로 접속
02 if문
if [ 조건 ]
then
참일 때 명령어
else
거짓일 때 명령어
fi
** 비교 연산자
=
!=
-eq
-ne
-gt
-ge
-lt
-le
* 디렉토리/파일 연산자
if [ -f 파일명 ] -> 파일이 존재하는가?
if [ -d 디렉토리명 ] -> 디렉토리가 존재하는가?
itwill@ubuntu:~$ cd linux_ex/
itwill@ubuntu:~/linux_ex$ ls
1_grep.sh  a.txt  ch1  ch2  ch3  ch4  ch5  ch9  hosts
itwill@ubuntu:~/linux_ex$ du -sk ch9
56      ch9

itwill@ubuntu:~/linux_ex$ du -sk ch9 | cut -d" " -f1
56      ch9

itwill@ubuntu:~/linux_ex$ du -sk ch9 | cut -f1
56
파일사이즈 측정하기
itwill@ubuntu:~/linux_ex/ch9$ ls -l 1_grep.sh
-rwxr--r-- 1 itwill itwill 377 Jul 16 11:34 1_grep.sh
itwill@ubuntu:~/linux_ex/ch9$ ls -l 1_grep.sh | cut -d" " -f5
377
파일사이즈가 500 이상인 파일만 카피하기
itwill@ubuntu:~/linux_ex/ch9$ vi 5_backup.sh
* read 함수는 변수명을 정의하는 것이므로 $를 붙이지 않는다.
$는 호출시에 사용한다.
#!/bin/sh

# 파일명을 입력받고 해당 파일의 사이즈가 500Byte 이상이면 백업디렉토리에 백업

echo "파일명을 입력하세요(절대경로) : \c"
read fname

backdir=/home/itwill/linux_ex/ch9/backup

if [ -d $backdir ]
then
  echo
else
  mkdir -p $backdir
fi


fsize=$(ls -l $fname | cut -d" " -f5)

if [ $fsize -gt 500 ]
then
  echo "$fname 파일은 빅파일입니다"
  cp $fname $backdir
  echo "$backdir 디렉토리로 백업하였습니다"
else
  echo "$fname 파일은 빅파일이 아닙니다"
fi
* 자동완성은 앞 글자 몇 개를 작성한 뒤 tab을 누른다.
itwill@ubuntu:~/linux_ex/ch9$ ll
total 80
drwxr--r-- 4 itwill itwill  4096 Jul 20 10:21 ./
drwxrwxr-x 8 itwill itwill  4096 Jul 16 17:18 ../
-rwxr--r-- 1 itwill itwill 12288 Jul 16 17:18 .1_grep.sh.swp*
-rwxr--r-- 1 itwill itwill 12288 Jul 16 12:14 .3_wc.sh.swp*
-rw------- 1 itwill itwill 12288 Jul 20 10:21 .5_backup.sh.swp
-rwxr--r-- 1 itwill itwill   377 Jul 16 11:34 1_grep.sh*
-rwxr--r-- 1 itwill itwill   242 Jul 16 12:00 2_cut.sh*
-rwxr--r-- 1 itwill itwill   480 Jul 16 14:54 3_wc.sh*
-rw-rw-r-- 1 itwill itwill   303 Jul 16 15:58 4_if1.sh
-rw-rw-r-- 1 itwill itwill   538 Jul 20 10:21 5_backup.sh
drwxrwxr-x 2 itwill itwill  4096 Jul 20 10:20 backup/
drwxr--r-- 2 itwill itwill  4096 Jul 16 14:55 log/
-rwxr--r-- 1 itwill itwill   161 Jul 16 12:14 sh_260716.log*
-rwxr--r-- 1 itwill itwill     8 Jul 16 11:06 test.txt*

itwill@ubuntu:~/linux_ex/ch9$ sh 5_backup.sh
파일명을 입력하세요(절대경로) : /home/itwill/linux_ex/ch9/1_grep.sh

/home/itwill/linux_ex/ch9/1_grep.sh 파일은 빅파일이 아닙니다

itwill@ubuntu:~/linux_ex/ch9$ sh 5_backup.sh
파일명을 입력하세요(절대경로) : /home/itwill/linux_ex/ch9/5_backup.sh

/home/itwill/linux_ex/ch9/5_backup.sh 파일은 빅파일입니다
/home/itwill/linux_ex/ch9/backup 디렉토리로 백업하였습니다
파일 존재 여부 확인 후 백업 진행하기.
#!/bin/sh

# 파일명을 입력받고 해당 파일의 사이즈가 500Byte 이상이면 백업디렉토리에 백업

echo "파일명을 입력하세요(절대경로) : \c"
read fname

if [ -f $fname ]
then
  echo "$fname 파일이 존재합니다"
else
  echo "$fname 파일이 존재하지 않습니다."
  echo "프로그램을 종료하겠습니다."
  exit 1
fi

backdir=/home/itwill/linux_ex/ch9/backup

if [ -d $backdir ]
then
  echo
else
  mkdir -p $backdir
fi

fsize=$(ls -l $fname | cut -d" " -f5)

if [ $fsize -ge 500 ]
then
  echo "$fname 파일은 빅파일입니다"
  cp $fname $backdir
  echo "$backdir 디렉토리로 백업하였습니다"
else
  echo "$fname 파일은 빅파일이 아닙니다"
fi
itwill@ubuntu:~/linux_ex/ch9$ ls backup
5_backup.sh
itwill@ubuntu:~/linux_ex/ch9$ sh 5_backup.sh
파일명을 입력하세요(절대경로) : /home/itwill/linux_ex/ch9/5_backup.sh
/home/itwill/linux_ex/ch9/5_backup.sh 파일이 존재합니다
/home/itwill/linux_ex/ch9/5_backup.sh 파일은 빅파일입니다
/home/itwill/linux_ex/ch9/backup 디렉토리로 백업하였습니다
itwill@ubuntu:~/linux_ex/ch9$ sh 5_backup.sh
파일명을 입력하세요(절대경로) : /home/itwill/linux_ex/ch9/abc.sh
/home/itwill/linux_ex/ch9/abc.sh 파일이 존재하지 않습니다.
프로그램을 종료하겠습니다.03 case문
여러 값과 일치하는 상황에 대한 조건을 처리한다.
** 문법
case 대상 in
값1|값2|값3...)
명령어1
명령어2
;;
값4|값5|값6...)
명령어1
명령어2
;;
*)
명령어1
;;
esac
* case문의 경우 분기가 끝이 나면 ;; 로 종료 선언을 해야한다.
vi 6_case.sh
#!/bin/sh

# 파일명을 입력받고 500바이트 이상이면 백업
# 백업 시 백업할지를 묻는 쉘스크립트

echo "파일명을 입력하세요(절대경로) : \c"
read fname

backdir=/home/itwill/linux_ex/ch9/backup

fsize=$(ls -l $fname | cut -d" " -f5)

if [ $fsize -ge 500 ]
then
  echo "$fname 파일은 빅파일입니다"
  echo "백업을 진행할까요? (Y|N) : \c"
  read ans
  case $ans in
    Y|y|YES|yes|Yes)
      echo "백업을 진행하겠습니다"
      cp $fname $backdir
      echo "백업을 완료하였습니다"
      ;;
    N|n|NO|no|No)
      echo "백업을 진행하지 않겠습니다"
      ;;
    *)
      echo "잘못 입력하였습니다"
      ;;
  esac
else
  echo "$fname 파일은 빅파일이 아닙니다"
fi
itwill@ubuntu:~/linux_ex/ch9$ ls
1_grep.sh 3_wc.sh 5_backup.sh backup sh_260716.log
2_cut.sh 4_if1.sh 6_case.sh log test.txt
itwill@ubuntu:~/linux_ex/ch9$ sh 6_case.sh
파일명을 입력하세요(절대경로) : /home/itwill/linux_ex/ch9/6_case.sh
/home/itwill/linux_ex/ch9/6_case.sh 파일은 빅파일입니다
백업을 진행할까요? (Y|N) : no
백업을 진행하지 않겠습니다
itwill@ubuntu:~/linux_ex/ch9$ sh 6_case.sh
파일명을 입력하세요(절대경로) : /home/itwill/linux_ex/ch9/6_case.sh
/home/itwill/linux_ex/ch9/6_case.sh 파일은 빅파일입니다
백업을 진행할까요? (Y|N) : 1
잘못 입력하였습니다[ 연습문제 - 7_head.sh ]
파일명을 입력받고
파일을 미리보기 할까요? 질문에
yes -> 위에서 10줄 출력하기
no -> 아무것도 출력하지 않기
[ 내 답변 ]
#!/bin/sh

echo "파일명을 입력하세요 (절대경로) : \c"
read fname

if [ -f $fname ]
then
  echo "파일을 미리보기 할까요? (Y|N) : \c"
  read ans
  case $ans in
    Y|y|YES|yes|Yes)
      head -10 $fname
    ;;
    N|n|NO|no|No)
    ;;
    *)
    echo "잘못 입력하였습니다."
    ;;
  esac
else
  echo "$fname 파일은 존재하지 않습니다."
fi

itwill@ubuntu:~/linux_ex/ch9$ sh 7_head.sh
파일명을 입력하세요 (절대경로) : /home/itwill/linux_ex/ch9/5_backup.sh
파일을 미리보기 할까요? (Y|N) : Y

#!/bin/sh

# 파일명을 입력받고 해당 파일의 사이즈가 500Byte 이상이면 백업디렉토리에 백업

echo "파일명을 입력하세요(절대경로) : \c"
read fname

if [ -f $fname ]
then

itwill@ubuntu:~/linux_ex/ch9$ sh 7_head.sh
파일명을 입력하세요 (절대경로) : /home/itwill/linux_ex/ch9/5_backup.sh
파일을 미리보기 할까요? (Y|N) : N

itwill@ubuntu:~/linux_ex/ch9$ sh 7_head.sh
파일명을 입력하세요 (절대경로) : /home/itwill/linux_ex/ch9/abc.sh
/home/itwill/linux_ex/ch9/abc.sh 파일은 존재하지 않습니다.

[ 답안 ]
#!/bin/sh

echo "파일명을 입력하세요 : \c"
read fname

# 파일 존재여부 체크
if [ ! -f $fname ]
then
  echo "$fname 파일은 존재하지 않습니다."
  exit 1
fi

# main
echo "해당 파일을 미리보기 하겠습니까? \c"
read ans

case $ans in
  [Yy]*)
    head -10 $fname
    ;;
  [Nn]*)
    echo
    ;;
  *)
    echo "잘못된 입력입니다."
    ;;
esac
04 서버 대 서버 파일 전송 프로그램 - winscp
https://winscp.net/eng/download.php
WinSCP :: Official Site :: Download
WinSCP 6.5 Download WinSCP 6.5 is a major application update. New features and enhancements include: Thumbnail view in file panels. Three selectable sizes of toolbar icons, showing slightly larger size by default. Switching to Segoe UI font with slightly l
winscp.net
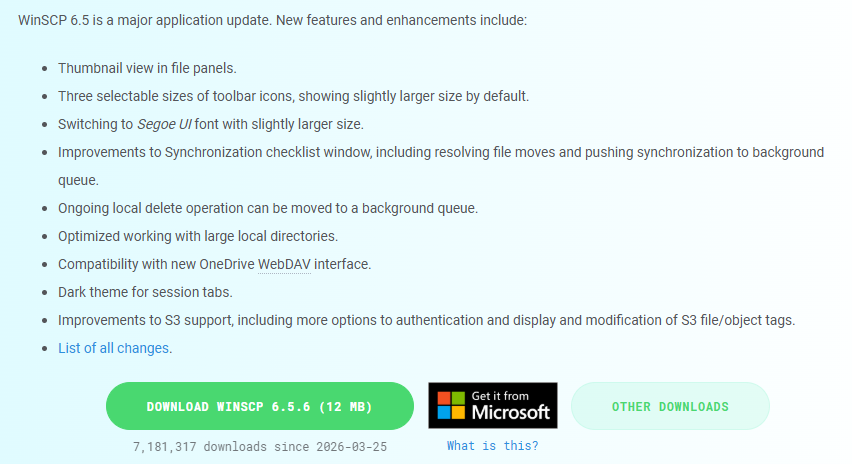
Download windcp 버튼을 눌러 다운로드를 진행한다.
설치는 특별한 옵션 없이 기본적으로 설정되어 있는 옵션대로 설치를 진행한다.
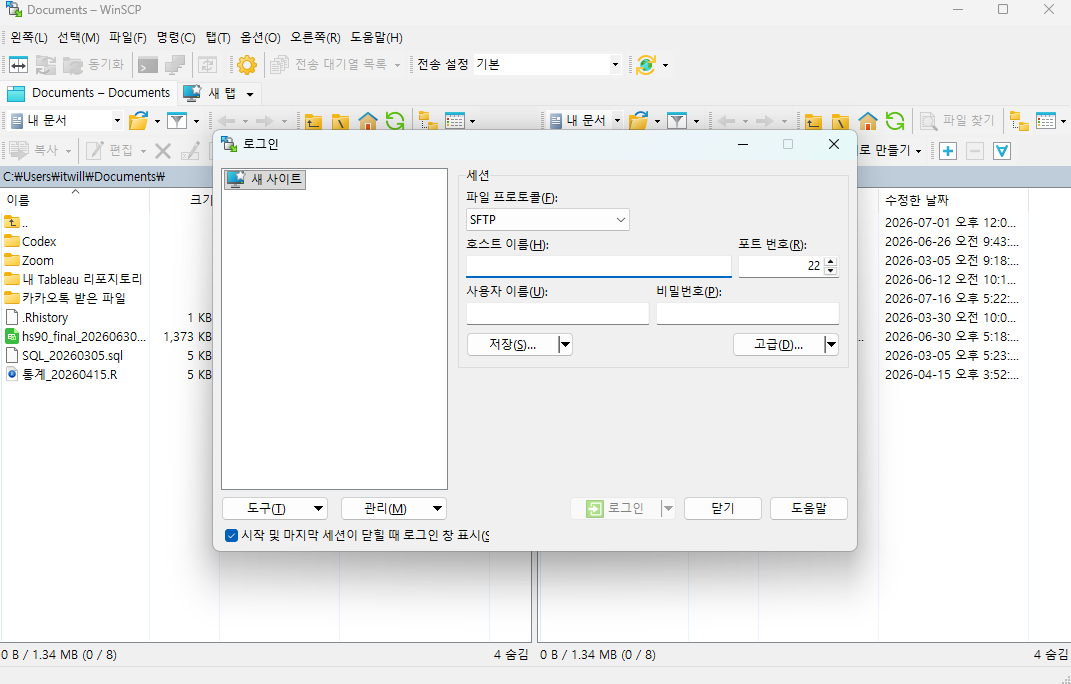
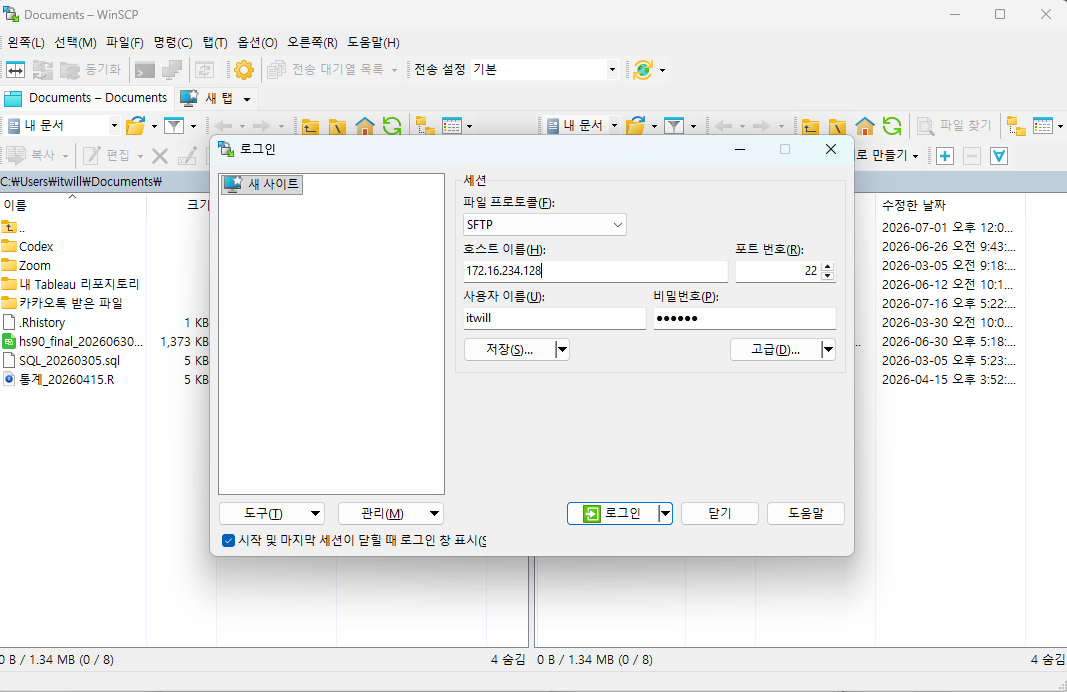
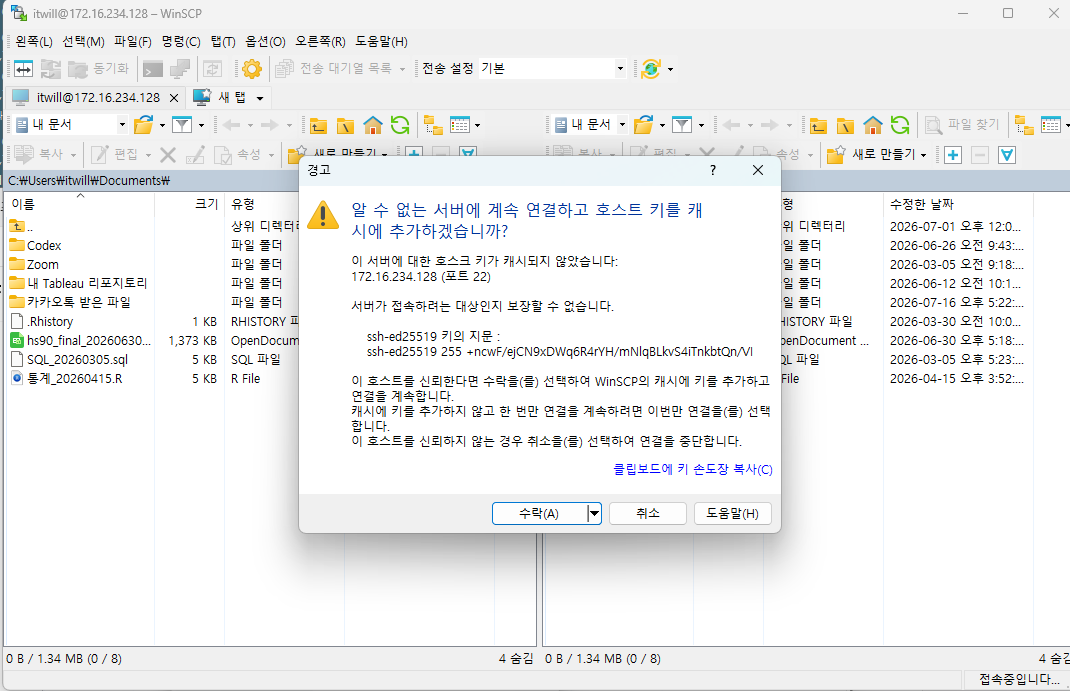
호스트 이름, 사용자 이름, 비밀번호를 입력한다.
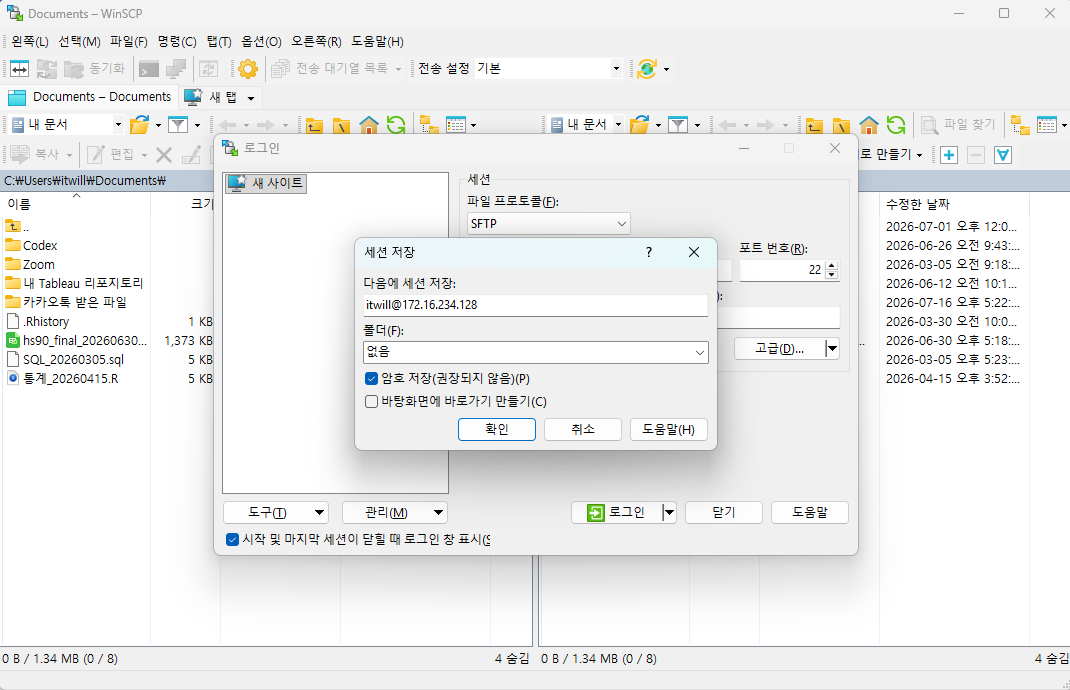
그대로 로그인해도 좋으나 편의를 위해 좌측하단의 저장 버튼을 눌러서 해당 정보를 기억하도록 한다.
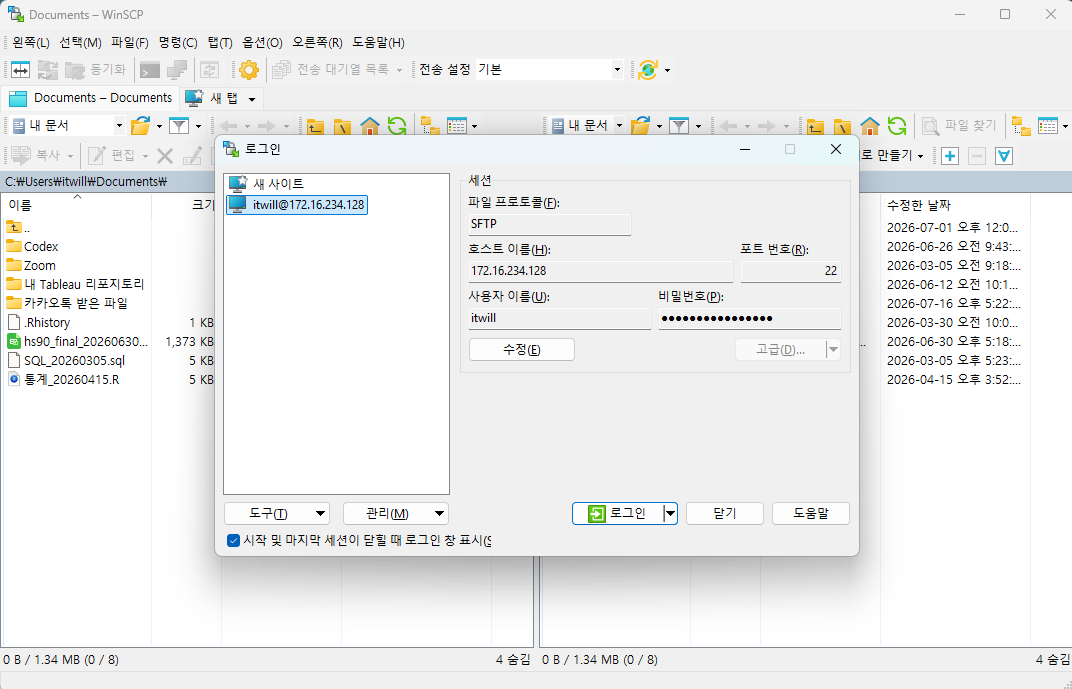
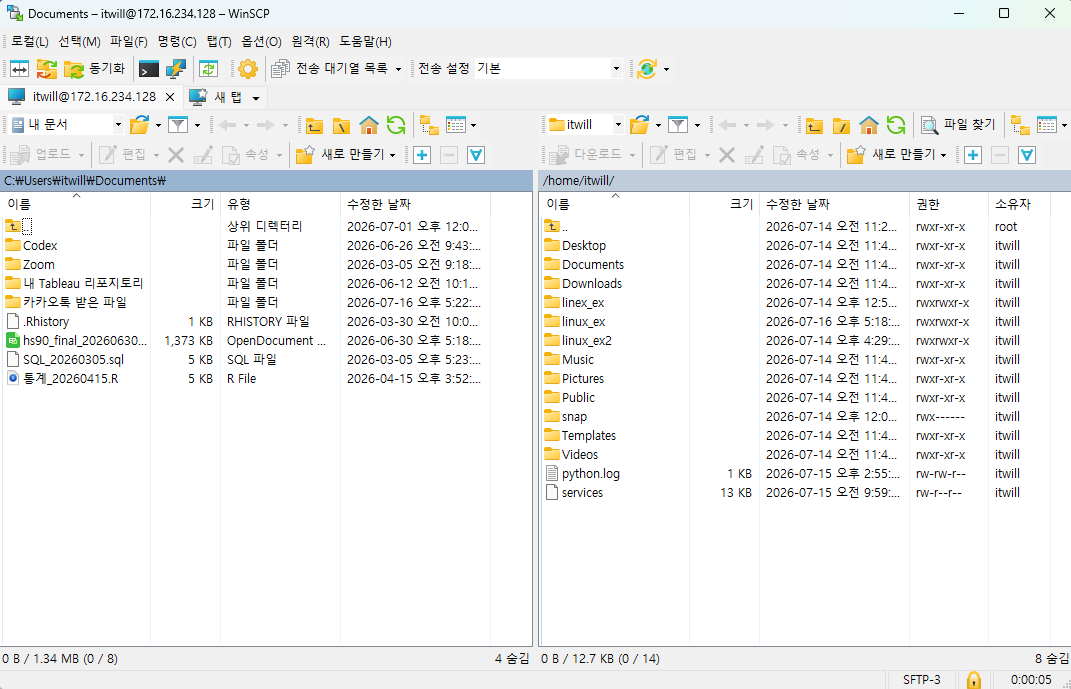
좌측은 윈도우, 오른쪽은 리눅스 서버이다.
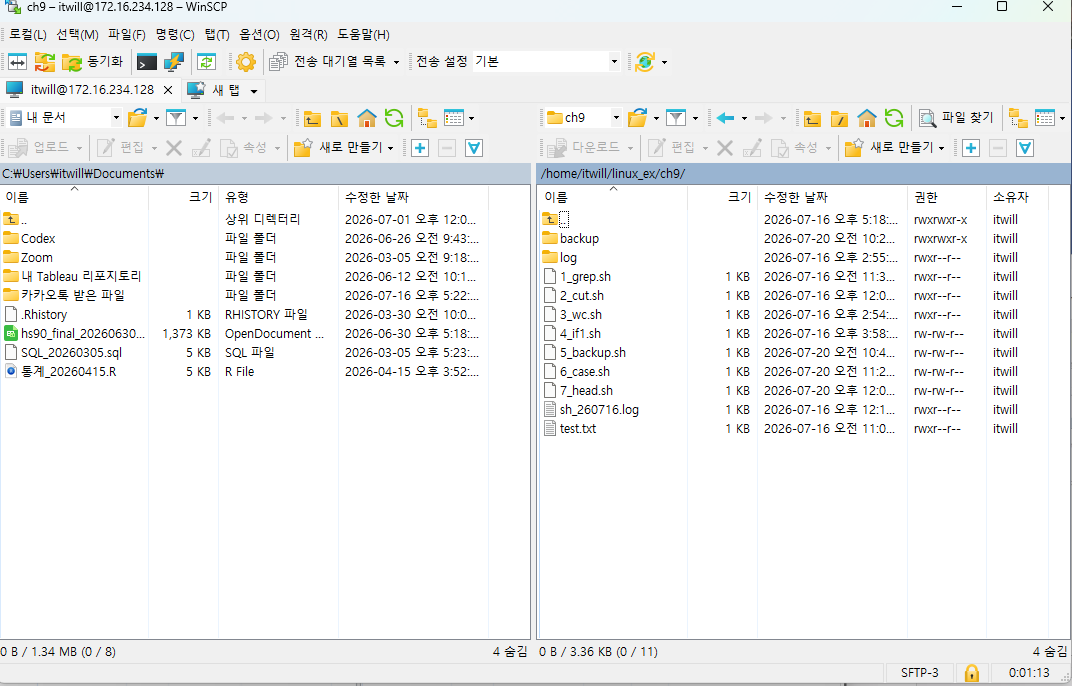

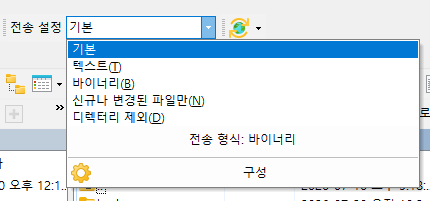

윈도우는 .sh를 읽을 수 없기 때문에, 상단 전송 설정을 텍스트로 지정한 후 옮겨주어야한다.

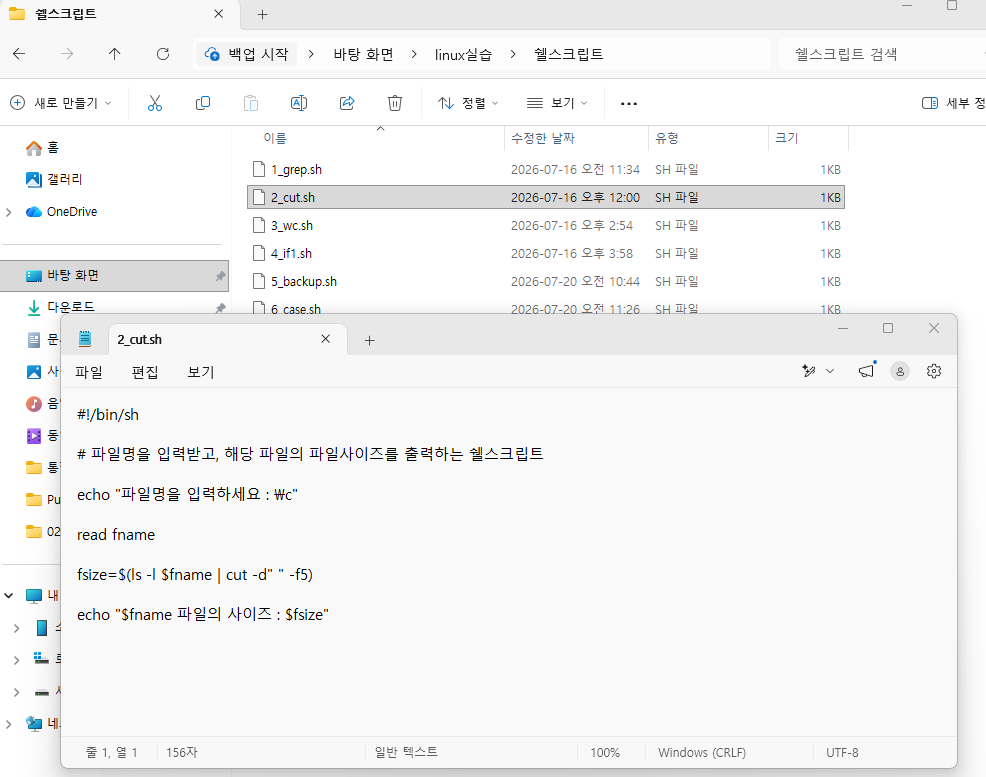
윈도우에서 텍스트로 읽어야하기 때문에 메모장으로 불러와주면 된다.
정상적으로 내용이 불러와졌음을 확인할 수 있다.
05 유저 생성 및 파일/디렉토리 소유자 변경
-01 useradd
유저를 생성한다.
* 문법
useradd [옵션] 사용자명
* 옵션
-m : 홈디렉토리 생성
-d : 홈디렉토리 경로 지정 (/home/유저명)
-s : 로긴쉘 지정(/bin/bash)
-g : 그룹 지정
itwill@ubuntu:~/linux_ex/ch9$ useradd -m -d /home/oracle -s /bin/bash oracle
useradd: Permission denied.
useradd: cannot lock /etc/passwd; try again later.
itwill 유저는 새 유저 생성에 대한 권한이 없기 때문에 permission denied.가 발생한다.
# oracle 유저 계정 정보 생성
itwill@ubuntu:~/linux_ex/ch9$ sudo useradd -m -d /home/oracle -s /bin/bash oracle
[sudo: authenticate] Password:

# oracle 유저 생성 확인
itwill@ubuntu:~/linux_ex/ch9$ grep oracle /etc/passwd
oracle:x:1001:1001::/home/oracle:/bin/bash

# oracle 유저 비밀번호 설정
itwill@ubuntu:~/linux_ex/ch9$ sudo passwd oracle
New password:
BAD PASSWORD: The password is shorter than 8 characters
Retype new password:
passwd: password updated successfully
oracle 유저 생성 및 비밀번호 설정이 완료되었다.
-02 chown
파일/디렉토리의 소유자를 변경한다.
* 문법
chown [옵션] 유저명:그룹명
sudo chown oracle:oracle 7_head.sh와 같은 식으로 권한을 변경할 수 있으며, sudo chown itwill:itwill 7_head.sh를 통해 원래대로 복구할 수 있다.
backup의 소유자 변경은 마찬가지로 sudo chown oracle:oracle backup으로 설정한다.
itwill@ubuntu:~/linux_ex/ch9$ sudo chown oracle:oracle backup
itwill@ubuntu:~/linux_ex/ch9$ ls -l
total 44
-rwxr--r-- 1 itwill itwill  377 Jul 16 11:34 1_grep.sh
-rwxr--r-- 1 itwill itwill  242 Jul 16 12:00 2_cut.sh
-rwxr--r-- 1 itwill itwill  480 Jul 16 14:54 3_wc.sh
-rw-rw-r-- 1 itwill itwill  303 Jul 16 15:58 4_if1.sh
-rw-rw-r-- 1 itwill itwill  721 Jul 20 10:44 5_backup.sh
-rw-rw-r-- 1 itwill itwill  767 Jul 20 11:26 6_case.sh
-rw-rw-r-- 1 itwill itwill  389 Jul 20 12:15 7_head.sh
drwxrwxr-x 2 oracle oracle 4096 Jul 20 10:28 backup
drwxr--r-- 2 itwill itwill 4096 Jul 16 14:55 log
-rwxr--r-- 1 itwill itwill  161 Jul 16 12:14 sh_260716.log
-rwxr--r-- 1 itwill itwill    8 Jul 16 11:06 test.txt
* 옵션
-R : 디렉토리 하위의 모든 파일 및 디렉토리의 권한을 변경하는 옵션 (원칙적으로 디렉토리 소유자 변경 시 디렉토리만 변경됨)
-03 su
유저를 변경한다.
* 문법
su - 유저명
itwill@ubuntu:~/linux_ex/ch9$ su - oracle
Password:
oracle@ubuntu:~$ cd
oracle@ubuntu:~$ pwd
/home/oracle
oracle@ubuntu:~$ ls -al
total 20
drwxr-x--- 2 oracle oracle 4096 Jul 20 12:37 .
drwxr-xr-x 4 root   root   4096 Jul 20 12:37 ..
-rw-r--r-- 1 oracle oracle  220 Feb 13 21:16 .bash_logout
-rw-r--r-- 1 oracle oracle 3771 Feb 13 21:16 .bashrc
-rw-r--r-- 1 oracle oracle  807 Feb 13 21:16 .profile
oracle 유저로 변경되었다.
oracle@ubuntu:~$ grep oracle /etc/group
oracle:x:1001:
oracle 유저가 소속된 그룹 역시 oracle임을 확인하였다.
기존 itwill로 돌아오기 위해서는 swith user를 할 필요가 없다.
exit를 입력하면 된다.
oracle@ubuntu:~$ exit
logout
itwill@ubuntu:~/linux_ex/ch9$
06 find
파일/디렉토리를 찾을 때 사용한다.
* 문법
find 찾을경로 (절대경로, 상대경로 모두 사용 가능하다.)
* 옵션
-name : 이름전달
-type : f(파일), d(디렉토리)
-user : 소유자
-maxdepth : 찾을 위치(depth 지정) 경로명 바로 뒤에 전달 필요
-mtime : 수정시간
-ctime : 생성시간
-atime : 접근시간
$ find. -maxdeepth 1 -type d
$ find /home/itwill -type f -name "*.sh"
* 동작
-exec cp {} \;
ex)
$ find . -maxdepth 1 -type d -exec rm -r {} \;
$ find . -maxdepth 1 -type f -exec cp {} backup \;
{} 는 앞에 있는 find 의 결과를 이 위치에 전달하라는 위치 지정용이다.
itwill@ubuntu:~/linux_ex/test$ ls
1.txt  2.txt  a.txt  b.txt  c.txt  d.txt  e.txt  list.txt

itwill@ubuntu:~/linux_ex/test$ ls -l
total 8
-rw-rw-r-- 1 itwill itwill 16 Jul 20 13:58 1.txt
-rw-rw-r-- 1 itwill itwill  0 Jul 20 13:59 2.txt
-rw-rw-r-- 1 itwill itwill  0 Jul 20 13:39 a.txt
-rw-rw-r-- 1 itwill itwill  0 Jul 19 15:00 b.txt
-rw-rw-r-- 1 itwill itwill  0 Jul 18 15:00 c.txt
-rw-rw-r-- 1 itwill itwill  0 Jul 17 15:00 d.txt
-rw-rw-r-- 1 itwill itwill  0 Jul 16 15:00 e.txt
-rw-rw-r-- 1 itwill itwill 24 Jul 20 13:53 list.txt
itwill@ubuntu:~/linux_ex/test$ find . -mtime +2
./e.txt
./d.txt

itwill@ubuntu:~/linux_ex/test$ find . -mtime +2 -exec ls -l {} \;
-rw-rw-r-- 1 itwill itwill 0 Jul 16 15:00 ./e.txt
-rw-rw-r-- 1 itwill itwill 0 Jul 17 15:00 ./d.txt
itwill@ubuntu:~/linux_ex/test$ find . -mtime +2 -exec rm {} \;
itwill@ubuntu:~/linux_ex/test$ ls
1.txt 2.txt a.txt b.txt c.txt list.txt
itwill@ubuntu:~/linux_ex/test$ mkdir backup
itwill@ubuntu:~/linux_ex/test$ find . -mtime +0 -exec cp backup {} \;
cp: -r not specified; omitting directory 'backup'
cp: -r not specified; omitting directory 'backup'
itwill@ubuntu:~/linux_ex/test$ ls backup
itwill@ubuntu:~/linux_ex/test$ find . -type f -mtime +0 -exec cp {} backup \;
itwill@ubuntu:~/linux_ex/test$ ls backup
b.txt c.txt
절대경로로 지정하면 절대경로까지 모두 출력하며, 상대경로로 지정하면 해당 폴더 하위 폴더만 출력된다.
itwill@ubuntu:~/linux_ex/ch9$ find . -name "*.sh"
./backup/5_backup.sh
./1_grep.sh
./4_if1.sh
./6_case.sh
./2_cut.sh
./3_wc.sh
./5_backup.sh
./7_head.sh
itwill@ubuntu:~/linux_ex/ch9$ find /home/itwill/linux_ex/ch9 -name "*.sh"
/home/itwill/linux_ex/ch9/backup/5_backup.sh
/home/itwill/linux_ex/ch9/1_grep.sh
/home/itwill/linux_ex/ch9/4_if1.sh
/home/itwill/linux_ex/ch9/6_case.sh
/home/itwill/linux_ex/ch9/2_cut.sh
/home/itwill/linux_ex/ch9/3_wc.sh
/home/itwill/linux_ex/ch9/5_backup.sh
/home/itwill/linux_ex/ch9/7_head.sh
파일 경로가 변경되었을수도 있기 때문에 가급적 절대경로로 지정하는 것이 좋다.
depth가 다양한 경우 원하는 depth 수준에서 찾고 싶다면 다음고 같이 작성하면 된다.
itwill@ubuntu:~/linux_ex/ch9$ find /home/itwill/linux_ex/ch9 -maxdepth 1 -name "*.sh"
/home/itwill/linux_ex/ch9/1_grep.sh
/home/itwill/linux_ex/ch9/4_if1.sh
/home/itwill/linux_ex/ch9/6_case.sh
/home/itwill/linux_ex/ch9/2_cut.sh
/home/itwill/linux_ex/ch9/3_wc.sh
/home/itwill/linux_ex/ch9/5_backup.sh
/home/itwill/linux_ex/ch9/7_head.sh
find 실습을 위한 수정시간 수정을 우선 진행한다.
itwill@ubuntu:~/linux_ex$ mkdir test
itwill@ubuntu:~/linux_ex$ cd test
itwill@ubuntu:~/linux_ex/test$ touch a.txt b.txt c.txt d.txt e.txt

itwill@ubuntu:~/linux_ex/test$ ls -l
total 0
-rw-rw-r-- 1 itwill itwill 0 Jul 20 13:39 a.txt
-rw-rw-r-- 1 itwill itwill 0 Jul 20 13:39 b.txt
-rw-rw-r-- 1 itwill itwill 0 Jul 20 13:39 c.txt
-rw-rw-r-- 1 itwill itwill 0 Jul 20 13:39 d.txt
-rw-rw-r-- 1 itwill itwill 0 Jul 20 13:39 e.txt

itwill@ubuntu:~/linux_ex/test$ touch -t 07191500 b.txt
itwill@ubuntu:~/linux_ex/test$ touch -t 07181500 c.txt
itwill@ubuntu:~/linux_ex/test$ touch -t 07171500 d.txt
itwill@ubuntu:~/linux_ex/test$ touch -t 07161500 e.txt

itwill@ubuntu:~/linux_ex/test$ ls -l
total 0
-rw-rw-r-- 1 itwill itwill 0 Jul 20 13:39 a.txt
-rw-rw-r-- 1 itwill itwill 0 Jul 19 15:00 b.txt
-rw-rw-r-- 1 itwill itwill 0 Jul 18 15:00 c.txt
-rw-rw-r-- 1 itwill itwill 0 Jul 17 15:00 d.txt
-rw-rw-r-- 1 itwill itwill 0 Jul 16 15:00 e.txt
만 이틀이 지난 일자, 만 하루가 지난 일자를 찾아본다.
itwill@ubuntu:~/linux_ex/test$ find . -mtime +1
./e.txt
./d.txt

itwill@ubuntu:~/linux_ex/test$ find . -mtime +0
./c.txt
./e.txt
./d.txt
itwill@ubuntu:~/linux_ex/test$ find . -mtime +0 > list.txt
itwill@ubuntu:~/linux_ex/test$ cat list.txt
./c.txt
./e.txt
./d.txt
07 리다이렉션
표준 입출력 장치를 변경한다.
> : 표준 출력 장치 (모니터) 변경, 덮어쓰기
>> : 이어쓰기
1> : 정상 출력 리다이렉션
2> : 비정상 출력 리다이렉션
< : 표준 입력 장치 변경 (키보드) 변경
<< : 이어쓰기
ex)
$ find / -mtime +3 -type d -name "python*" > 1.txt 2> /dev/null
정상출력은 1.txt 파일에 출력, 비정상출력은 널장치에 버림
$ find / -mtime +3 -type d -name "python*" > 1.txt 2>&1
정상출력은 1.txt 파일에 출력, 비정상출력은 정상출력 공간에 출력
itwill@ubuntu:~/linux_ex/test$ find / -mtime +3 -type d -name "python*" > 1.txt
find: ‘/lost+found’: Permission denied
find: ‘/proc/tty/driver’: Permission denied
find: ‘/proc/1/task/1/fd’: Permission denied
find: ‘/proc/1/task/1/fdinfo’: Permission denied
find: ‘/proc/1/task/1/ns’: Permission denied
...

# 1.txt에는 정상출력만 있었기에 permission denied를 확인할 수 없었다.
itwill@ubuntu:~/linux_ex/test$ cat 1.txt
/var/lib/python
08 crontab - 예약 기능
분 단위 등으로 명령이 가능하며, 백그라운드로 실행된다. (cron 데몬)
1) 자동화 스크립트 작성
2) 실행권한 부여하기 (파일명 단독으로 실행가능한 형태)
$ chmod a+x 파일명
3) crontab 등록
$ crontab -e (최초 실행 시 편집기 묻는 화면에서 -> 2번 선택 (vim 편집기))
$ crontab -l (작성된 내용 확인)
** 작성 양식
분 시간 일 월 요일 명령어
ex)
00 00,12 * * * /home/itwill/test1.sh -> 매일 자정, 오후 12시에 수행
00 3 1 * * /home/itwill/test1.sh -> 매월 1일 새벽 3시 수행
00 3 * * 6 home/itwill/test1.sh -> 매주 토요일 새벽 3시 수행 (일:0, 월:1, 화:2, 수:3, 목 :4, 금:5, 토:6)
itwill@ubuntu:~/linux_ex/test$ crontab -e
no crontab for itwill - using an empty one
Select an editor.  To change later, run select-editor again.
  1. /bin/nano        <---- easiest
  2. /usr/bin/vim.tiny
  3. /bin/ed

Choose 1-3 [1]: 2
# Edit this file to introduce tasks to be run by cron.
#
# Each task to run has to be defined through a single line
# indicating with different fields when the task will be run
# and what command to run for the task
#
# To define the time you can provide concrete values for
# minute (m), hour (h), day of month (dom), month (mon),
# and day of week (dow) or use '*' in these fields (for 'any').
#
# Notice that tasks will be started based on the cron's system
# daemon's notion of time and timezones.
#
# Output of the crontab jobs (including errors) is sent through
# email to the user the crontab file belongs to (unless redirected).
#
# For example, you can run a backup of all your user accounts
# at 5 a.m every week with:
# 0 5 * * 1 tar -zcf /var/backups/home.tgz /home/
#
# For more information see the manual pages of crontab(5) and cron(8)
#
# m h dom mon dow command
...
# minute (m), hour (h), day of month (dom), month (mon),
# and day of week (dow) or use '*' in these fields (for 'any').
# m h dom mon dow command
* 15 * * * /home/itwill/linux_ex/ch9/8_cron.sh8_cron.sh 는 echo "현재날짜 : $(date)" >> /home/itwill/linux_ex/ch9/cron.log 이다.
즉, 매 년, 매 달, 매 일 15시 매 분마다 현재날짜가 cron.log에 쌓이게 된다.
** itwill@ubuntu:~/linux_ex/ch9$ date
Mon Jul 20 02:47:10 PM KST 2026
무슨 이유에서인지 ubunt 시간대가 실제 시간대와 1시간 차이가 있었다.
15시의 매 분 로그를 갱신하는 반복작업이었는데 ubunt는 아직 14시에 머무르고 있어서 자동실행이 아직 되지 않고 있었던 것을 뒤늦게 확인하였으며, 향후 설정 시 date로 현재 시간이 정확한지 확인 후 반복작업을 걸어야 한다.
'아이티윌_데이터 분석 55기 > 강의내용_Linux' 카테고리의 다른 글
| #6 6일차_파이썬 스크립트 실행, 로깅 처리, 정렬, 특수기호 정의 (1) | 2026.07.22 |
|---|---|
| #5 5일차_반복문, 산술연산, 색 변수 설정, 지역변수/전역변수, 아나콘다 설치 (0) | 2026.07.21 |
| #3 환경설정 및 변수선언, 권한설정, 조건문 (0) | 2026.07.16 |
| #2 2일차_편집기 및 디렉토리 / 파일 확인하기 / 패턴 검색 / 파이프 (0) | 2026.07.15 |
| #1 1일차_Linux 설치 (0) | 2026.07.14 |